DIY Deep Water Culture System
A DIY deep water culture (DWC) bucket system is one of the best ways to start as a hydroponic gardener. Even if you’re an experienced hydropon, there are some undeniable benefits to a DWC system. If you want to skip the pre-made kits and make your own, this is the guide you need.
Difficulty: Easy
Pump Needed? Air pump
Supplies needed:
- Large bucket (ideally, a 3 or 5 gallon bucket)
- Tubing
- Aquarium air pump
- Airstone
- Net pots
- Grow media (Suggested: clay pebbles)
- Seeds/plants
- Lid (for bucket)
Suggested Supplies:
- Encore Plastics 5-Gallon General Bucket – Food Grade, FDA approved, Sturdy walls, Fits 12” lid
- Encore Plastics 12-in Blue Plastic Bucket Lid – Fits 3 & 5 gallon buckets, 12” diameter, high density polyethylene
- EZ-FLO 1/2-in Inner Diameter x 10-ft PVC Clear Vinyl Tubing
- Cambani Aquarium Air Pump – Suited for up to 13 gallons, Uses 1 watt only, includes, check valve, airstone, thermometer, suction cups and air stone
- Pawfly 4PCS Air Stone Bar – Includes 4 air stones, 4” long for better aeration, suited for 4mm (.16”) inner diameter tubing
- 2 inch Net Pots Cups Heavy Duty or 3 inch Net Pots Super Heavy Duty – Strong enough to support heavy plants, multi packs of 25 & 50, Food grade, wide rim keeps cups in place, money back guarantee – note, 2” cups work for a 4 site system, 3” cups work for a 3 site system
- Organic Expanded Clay Pebbles – Ideal for DWC systems, allows root growth and stability, pH neutral, 4lb bag
What Should You Know About Deep Water Culture (DWC) Hydroponics?
DWC (Deep Water Culture) Hydroponic System
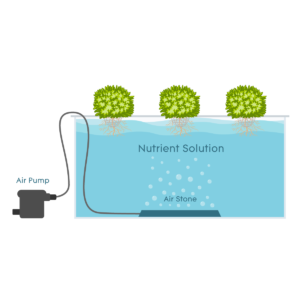
For all the different hydroponic setups, this DWC system is pretty simple. In Deep Water Culture systems, plants sit in a growing tray with their roots in netted cups that go into the water below. Rather than letting roots hang freely into the water, people usually use gardening cups (a.k.a netted cups or pots) to keep roots from getting tangled up. It’s a good idea to use a small air pump, because otherwise the roots might not get enough oxygen. There’s also a sturdy grow medium within the netted cup, to allow roots to hang on to some oxygen, and naturally branch outward.
You can find out more about how a DWC hydroponic system works here.
How to Make a DIY DWC System
- Prepare Your Materials
Make sure your reservoir, or bucket, is totally clean and dry. You should also have a lid for your bucket. We suggest using a lid, because it already fits the bucket, and cuts down on your work and measurements a lot. You’ll be cutting holes into the lid of the bucket so you can put your netted cups in them. The cups should fit snugly, without wobbling in the hole. It’s best to measure and mark the holes before you start. This varies slightly, depending on whether you use the 2 or 3 inch cups.
The important thing about where you cut the lid: make sure you cut the lid so that the netted cup fits, and can reach to the water. If the hole is too big, don’t worry. It’s more important right now to be sure the cup can reach the water. You may even need to fill your reservoir bucket to make sure the cups reach.
Now, if the cup fits perfectly, you can skip this step. If the cup is too small, it’s time for the foam. The foam will be a big help in getting the cup to stay in place without dropping into the bottle. The easiest way to measure the foam is just by tracing:
Put the bucket upside down on top of your foam or styrofoam. Lightly trace the circle around the bucket, and leave a little extra room (don’t trace right around the bottle). Cut it out. Then put the netted cup upside down on the foam and trace it. When you trace the cup, you do want to get as close as possible, and in fact, you’ll be cutting the foam down slightly smaller than your traced circle. Cut it out.
2. Get The Reservoir Ready
This part is easy. Find a good spot where you’ll keep your plants, and fill your reservoir (the bucket) with water. The water level should be high enough that it will reach the bottom of your cup, but not enough to cover the entire cup.
This may take a little guessing and checking, but that’s not a problem.
While you don’t need a water pump, you do need an air pump. An air pump shouldn’t be too expensive, but it’s the key to getting air to plant roots. Connect the airstone to one end of the tubing, and the air pump to the other end of the tubing. Once your system is set up and ready to go, just plug it in and it’ll pump air into the air stone, giving plants the oxygen they need.
Related: Why is an air stone important? Sometimes, a hydroponic system doesn’t need an air stone. Examples include NFT, Drip, or an Ebb and Flow hydroponic system. The nutrient solution, or water, doesn’t constantly cover the roots. Plants use the air within the grow media or when roots are exposed. Because there isn’t any nutrient solution ‘flowing’ and aerating as a result, you need to place an airstone in the reservoir of your deep water culture system.
3. Growing Medium, and Some Handiwork
Chances are, your netted cup has holes that are too large to simply set your plant in. In most cases you’ll need to use some growing medium to keep your plants from falling into the water. The roots are really the only thing that should be in the reservoir, and as the plant grows the roots will reach further and further into the water.
If somehow your netted cup has small enough holes that your plant can fit without falling through, go for it! But be careful to make sure that the roots can get through the holes. Otherwise they won’t be able to grow and spread out properly. Also, just make sure your plant is stable if you’re not using growing medium: even a little growing medium adds a lot of stability. A big reason for filling your net pot with grow media, is that it also holds onto some air bubbles, which plants can use later.
First, cover the surface you’re working on with some newspaper or paper towels. Set your net pot down and gradually begin filling it with growing medium, pressing slightly when needed to create a more solid layer. Then, move onto the next net pot.
Lightly mist the growing medium with water. This does make it easier to put the plant in. However, it also helps to prevent the growing medium from lifting up and knocking over the plant once you put it in your reservoir (the bucket). Then, use your pinky finger and make a small dent in the medium, where you can put your plant in.
4. Get Your Plants Into Their New DIY DWC Home
Now, you can put your plant in the ‘grow cup’ either before or after fitting the grow cup (or net pot) on the 3 or 5 gallon bucket. But, to make less mess and work, it’s easier to put the plant in first. Gently place your plant in the dent you made, trying to keep the roots as close as possible to the bottom of the cup.
Lightly press the growing medium around the plant to keep it in place.
Very carefully move your growing cup to the reservoir or bucket. If you had to cut foam to get your cup to fit, place the foam over the openings in the bucket..
It’s a good idea to have one set of hands hold the foam and bucket in place while another set of hands puts the growing cup into the hole in the foam. You don’t want to press too hard to put the cup in the foam, but make sure it fits nice and snug.
If you don’t have an extra set of hands, place the foam first, and the netted cups next.
5. Enjoy, and Watch the Roots Start to Appear
This is the beginning of the really exciting part. While it will take at least a couple days, and even up to a week, the show is about to begin. Over time you’ll see the roots begin to emerge from the bottom of the cup. As the plant grows, the roots will keep growing longer, and reaching deeper and deeper into the water.
Fill your bucket with water (and nutrient solution). The goal is for the nutrient solution to cover plant roots, but you want the rest of the plant above the water.
Make sure you add in new water whenever you notice the water level getting lower in the bottle. You should also test the EC and pH of your nutrient solution to ensure a proper environment for your plants. While DWC hydroponic systems are fairly low maintenance, you still need to check up on it and do water changes. You should be checking your system at least once every 24 hours.
Not sure where to start? Don’t worry! These water change and maintenance guides have everything you need to know.


