DIY Nutrient Solution for Vegetative Growth
DIY nutrient solution for vegetative plants is a great way to get to know your hydroponic system, and your plants, a lot better. Once you learn how to perfect your homemade nutrient solution recipe, you can even end up saving a lot of money in the long run. Vegetative plants need a lot more nitrogen, but they also need that perfect amount of phosphorus, potassium, secondary macronutrients, and of course, micronutrients. Not sure where to begin? Here’s a simple guide you can use to get started.
 Before You Start – Vegetative Nutrient Solution
Before you start mixing your nutrient solution, you need to gather your ingredients. Of course, that isn’t the only thing you need to take care of. You need to gather all your materials, prepare your space, and make sure you have the equipment to test your final solution before you give it to your plants.
We always recommend starting with the purest water possible to avoid any contamination or excess minerals in your solution. If you want the absolute purest water, make sure you use reverse osmosis water. Yes, you can use purified water, or distilled water. However, just be aware that there may still be excess minerals in the solution. Ultimately, that can mean a less balanced nutrient solution, since you’re already adding a balanced nutrient formula, and excess minerals can throw that off.
Use a clean, organized workspace. It makes your job easier, and it also prevents contaminants from getting into your nutrient solution. Always use the appropriate protective equipment, like gloves, a mask, or even eye protection, depending on the elements you’re mixing.
A note about scales: scales aren’t a ‘one size fits all’ endeavor. They come in many different levels of accuracy, from broad to fine tuned. If you’re serious about making your own nutrient solution long term, it’s best to have a scale for large, bulk measurements, and another for small measurements for things like micronutrients, where you don’t need much, but the measurements need to be super specific.
Basic Equipment
The basic equipment you need for homemade nutrient solution isn’t complicated. Even though scales might seem like the more costly pieces of equipment, keep in mind that you can use them for a long time, as long as you calibrate them regularly. Those aside, the equipment you need is fairly simple, and really affordable.
Basic equipment for vegetative diy nutrient solution:
- At least two mixing tools (sterilized)
- Mixing buckets (ideally 5+ gallons)
- EC and pH testing tools
- Protective equipment
- Extra cleaning cloths (for spills or accidents)
- Measuring cups (up to 1 cup)
- Measuring spoons (teaspoons and tablespoons)
- Quart + measuring cup with markation
- Purest water possible for mixing
- pH up or down (if adjustments are needed)
Nutrients for Vegetative Nutrient Solution
Next, we’ll look at the specific elements and minerals we need to make the proper DIY nutrient solution for vegetative growth. These are fairly simple ingredients, and quite easy to obtain. However, if you’re not making bulk batches yet, it’s best to buy minerals in smaller packages, to avoid expiration before you can use them. Once you perfect your diy nutrient solution, you’ll get a better idea of exactly how much you can use, and in how much time.
Learn more about nutrients in hydroponics.
Note: It’s easy to get over excited when you start making your own plant food. However, just because you have the ingredient list doesn’t mean your work is done. To learn how to properly mix your nutrients, look to the next section.
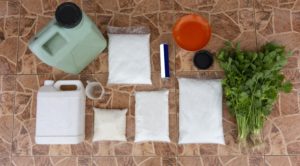
Before we get into measurements, here are the basic minerals and elements you need to gather:
- Calcium nitrate (carbonate if nitrate is unavailable)
- Magnesium sulfate (carbonate if nitrate is unavailable)
- Ammonium phosphate
- Potassium nitrate (sometimes labeled as potash)
- Boric acid
- Manganese chloride
- Chelated iron
- pH adjuster (pH up and pH down)
Basic nutrient measurements:
- 4 tsp of potassium nitrate
- 2 tsp of ammonium phosphate
- 4 tsp of magnesium sulfate
- 5 ½ tsp calcium nitrate
- ¼ tsp boric acid
- 1 tsp manganese chloride
- ½ tsp chelated iron
- 10 gallons pure water (preferably reverse osmosis)
The reason you shouldn’t mix all these together at once isn’t just to make sure everything dissolves. You’ll also be diluting your micronutrients more than your macronutrients. Mixing both together can create a huge imbalance.
Mixing Your Nutrients
As discussed, we highly recommend using reverse osmosis water for mixing your nutrient solution. You’re less likely to struggle with excesses of certain nutrients, and more likely to start with a balanced pH. Of course, it’s always a good idea to test your water’s pH and EC before you get started, no matter what kind of purified water you use. The most accurate, and efficient methods of testing for home growers are digital pens. You can get separate EC and pH readers, although some digital pens actually come as a ‘2 in 1’ device, and can read both. Keep in mind that you’ll also need to test your solution after mixing, and before you give it to your plants.
You already know you shouldn’t mix micronutrients and macronutrients together. However, it’s even better if you can mix each nutrient individually, to make sure you make as uniform a solution as possible.
It’s easiest if you get all your nutrients organized before you start, or at least separate micronutrients and macronutrients. This isn’t a complicated recipe, so you can really just set your manganese chloride, boric acid, and chelated iron apart from your other nutrients.
Start with macronutrients
Ideally, you will have a 10 gallon bucket you can use, filled with purified water, of course. Mix ammonium phosphate, calcium nitrate, magnesium sulfate, and potassium nitrate into your water, one at a time. Don’t skimp on the stirring. If you want to be really sure you’re getting everything dissolved, mix each nutrient by hand, and then seal and shake your mixing bucket. If you’re not sure whether everything’s dissolved, keep mixing (within reason, of course).
Micronutrients next
To properly mix and measure your micronutrients, you’ll need two separate containers, each measuring at least a quart each. Fill these with purified water, and set one aside. In the first container, you’ll be mixing your chelated iron. Note: don’t get overeager and add the other micronutrients yet (i.e. manganese chloride and boric acid).
Make sure you thoroughly mix the chelated iron. Then, measure out a cup and a half of this iron and water solution. This is what you’re ultimately adding to your macronutrient mix (in the 10 gallon bucket). Pour the chelated iron mixture into your big 10 gallon bucket, and set the rest aside if you want to store it for later.
Next, get your other quart of purified water out. We’ll be mixing the boric acid and manganese chloride. While you can mix both of these together, we still always recommend mixing each nutrient individually.
First, measure out your boric acid, and thoroughly dissolve it into your purified water. Once you’re sure it’s totally dissolved, you can move onto the manganese chloride. Measure it, and mix it into your quart container, where you’ve already dissolved the boric acid.
Plants don’t need as much micronutrients, so we don’t have to add much of this solution to meet your plants’ requirements. Measure out one cup of this solution and add it to the 10 gallon bucket with your other nutrients. Mix it well, and dispose of or store your unused micronutrients.
Check Your Work
Now, everything is mixed, uniform, and ready to go, right? Well, you’re close, but you’re not quite there yet. As we mentioned earlier, you should be testing your water before you mix nutrients in. However, you should also be testing your homemade nutrient solution before you give it to your plants.
Your EC level tells you the concentration (by way of electric conductivity) of the salts, AKA nutrients, in your solution. While it can’t tell you the exact amounts of each nutrient, it’s a feasible testing option for most home growers. All plants have different target EC ranges, and those also change as they move into different stages of growth. Make sure you know what your plants need, and that your nutrient solution falls within that range.
Next, check your pH levels. These tell you how acidic or alkaline your solution is. While 7 is neutral, anything below is acidic, and anything above is alkaline. Many plants do well with a pH between 5.5 and 6.5, although that can vary widely depending on which plants you grow, much like your EC levels.
If you notice your pH is off target, you can use pH Up or pH Down products to adjust your solution to the correct levels. Just go slowly, because even a little bit of adjuster can make a huge difference.
If your EC is too high, you can dilute your diy nutrient solution with clean water to lower it. If your EC levels are too low, that means you need to add more nutrients to reach optimal levels.
Keep an Eye on Your Plants
You can add diy nutrient solution just like you would premixed nutrient solution. However, you still need to test your system regularly and keep an eye on your plants. You should be doing pH and EC level checks daily, as well as topping off water when you notice some evaporation. Testing aside, one of the best things you can do to see how well your new nutrient solution is working is look at your plants. Make sure you check them regularly from bottom to top to see if there are any symptoms of nutrient deficiencies or of toxicity.
Need more info about nutrient deficiency symptoms and what they look like? Check out our guide!
If you’re not ready to make your own nutrient solution, we recommend this multi-part solution for vegetative plants:
 Before You Start – Vegetative Nutrient Solution